Wednesday 20 January 2016

Make Money With Sell Your Digital Photos Online

Have you ever thought about what it would be like to sell your digital photos?

Are you one of those people who think that your photos are actually only snapshots? Or maybe you think only your friends and family will praise your efforts. If you're a member of a photo club, you might have won or achieved a high position in some photography competitions which could perhaps boost your recognition of your own efforts.

Whether or not you think that you can sell your digital photos, that's truly down to another person - the person who's willing to buy your photo (or not!). Camera magazines are incredibly common, and all want photo submissions from their readers, so sending in a variety of your top photos to them is one way to get into print and wave the obliging magazine under the noses of doubters as you brag about being a "published" photographer. ;-)

Stock Photography

But there is a further way to sell your digital photos. It's called stock photography - images that can be used and reused for commercial design purposes. All photos are non-commissioned; that is - the photographer wasn't hired to do a job.

Book publishers, specialist publishers, magazines, advertising agencies, film makers, web designers, graphic artists, interior decor firms, corporate creative groups, and other businesses all use stock photography to fulfill the requirements of their creative assignments.


Stock Photography And You

With there being so many photo repositories online, many request photo submissions from hobbyist photgraphers instead of using work only from professional photographers. So that's where you come in. Select a number of your greatest digital photos and submit them to some of the online stock photo agencies. If accepted, the agencies will sell your digital photos for you.

Remember that the agencies will review your photos before they make a decision to accept or reject them. Yes, they have a few fundamental requirements that must be met before they'll accept your photos. Different image banks could have slightly different criteria. All you can do is try. You've nothing to lose. Just read what terms are provided so you can match what you submit as closely as possible to what each agency is seeking.

Submitting Photos

There are two ideas to reflect upon when submitting your work for review in order to get an image bank to sell your digital photos : Title and Keywords.

1. Choose as descriptive a title as possible for each of your photos as it'll help prospective customers discern the subject of the photo with less difficulty.

2. The other thing to think over is keywords related to the topic of your photo. These are used to match the search terms typed in by customers for photographs matching what they're searching for. So the greater the number keywords you use, the greater the likelihood of your photo appearing in the search results which, in turn, increases your chances of a sale.

Any agency with whom you sell your digital photos will not take copyright of your work. You always retain that. All you are doing is conferring on the stock photo agency a license to sell your digital photo and not the image itself. Most of the image banks run a non-exclusivity arrangement which means that you can submit your photographs to as many agencies as you like. A few stock photo agencies do provide optional exclusivity clauses which can result in you earning a higher payment per sale but that's something you have to size up against the number of sales you may make for the same photograph at all the other agencies you've submitted it to.

So what sized commissions can you expect to earn if you sell your digital photos?

Stock Photo agencies don't pay a large fee per photograph. They sell digital photos at low rates (from a dollar upwards) and don't forget that they cover the administration fees for handling transactions as well as hosting and serving the photos to customers.

Expect to earn $0.20 to $0.50 on average per sale. Profoundly popular photos will have higher commissions but it's best to assume yours won't be in that category. So you definitely aren't going to get rich overnight.

You've nothing to lose if you sell your digital photos online. The more photographs you submit, the more you will sell and the more money you will earn.

Friday 4 December 2015

Nature Photography Tips : How To Have Natural Light


Wildlife photography combines a range of skills, both creative and technical. Many people struggle with one aspect in particular; knowing the best light for capturing their wildlife photo.

To take a top-class wildlife photograph, you need to know your animal; where to find it, how to approach it without scaring it away, and how to know the precise moment to press the button to capture the character of the subject. Often a wildlife photographer will spend hours trying to get a good shot. What a shame, then, if all that effort is wasted by taking your photo in bad light.

As a nature photographer, I have learned that the ideal light for a photo can vary depending on the subject. Landscape photos are usually best photographed in sunny weather, early in the morning or late in the afternoon when the contrast is low and the light is soft and colouful. On the hand, rainforest photography is usually best in the middle of the day, in cloudy weather to eliminate extremes of light and shade. To understand the best lighting for wildlife photography, you can take a lesson from both landscape and rainforest photography.


To get the best light for a wildlife photo, you are really looking to minimize contrast, and to eliminate shadows from important areas; most importantly across the face of the animal.

If you take your photos in the middle of a sunny day, you are bound to encounter shadows in all the wrong places. Bright light is likely to overexpose parts of the subject, while the face and the underside of the animal could be lost in heavy shadow. The result will be unattractive, and lacking in much of the detail that should give character to your photo.

There is nothing wrong with taking your wildlife photos on a sunny day. Just remember the lesson from landscape photography and seek to take your photos early in the morning and late in the afternoon. At these times the subject is illuminated from a more horizontal angle, so the full face of the animal is well-lit; you are less likely to have shadows over the eyes and other important features. If there are shadows, they will be much softer because the contrast is much lower when the sun is low in the sky.

The light at these times is also much more colourful, with the golden hues you associate with sunrise and sunset. This is a classic technique for improving landscapes, but it can be just as effective for wildlife. The warmth of the light can create an intimacy in your pictures that is completely lost in the harsh light of midday.

The second approach is to follow the rule of rainforest photography, and take your photos in overcast weather. This allows you to catch your subject in very even, low-contrast light.

I find cloudy days particularly useful for animals with glossy surfaces. Frogs, for example, have damp, shiny skin that reflects a lot of light. In glaring conditions a green frog may appear mostly grey or silver in a photo. On a cloudy day the same frog will be shown in its true colours.

Birds can often appear more colourful on a cloudy day, for the very same reason. The sun shining on glossy feathers can create a lot of reflection, robbing the photo of its natural colour. It may seem the opposite of what you would expect, but the dull light of a cloudy day can actually produce the truest colours in a bright wildlife subject.

One final question you may ask: should you use a flash to illuminate a wildlife photo? My answer to that is a definite "NO." Flash photography bathes the subject in white light, coming from directly in front of the subject. It may illuminate the subject, but at the same time rob it of the natural play of light and shade that makes a good photo so appealing.

Some wildlife photography experts use multiple flashes to brightly illuminate a subject from every possible angle. This approach can work very well, but remember; these are experts in flash photography. If you are at the beginner stage, I recommend learning to work with natural light. When you get the hang of it, I guarantee you will be happy with the results.

Nature Photography Tips With Digital Camera


Wildlife photography combines a range of skills, both creative and technical. Many people struggle with one aspect in particular; knowing the best light for capturing their wildlife photo.

To take a top-class wildlife photograph, you need to know your animal; where to find it, how to approach it without scaring it away, and how to know the precise moment to press the button to capture the character of the subject. Often a wildlife photographer will spend hours trying to get a good shot. What a shame, then, if all that effort is wasted by taking your photo in bad light.

As a nature photographer, I have learned that the ideal light for a photo can vary depending on the subject. Landscape photos are usually best photographed in sunny weather, early in the morning or late in the afternoon when the contrast is low and the light is soft and colouful. On the hand, rainforest photography is usually best in the middle of the day, in cloudy weather to eliminate extremes of light and shade. To understand the best lighting for wildlife photography, you can take a lesson from both landscape and rainforest photography.

To get the best light for a wildlife photo, you are really looking to minimize contrast, and to eliminate shadows from important areas; most importantly across the face of the animal.

If you take your photos in the middle of a sunny day, you are bound to encounter shadows in all the wrong places. Bright light is likely to overexpose parts of the subject, while the face and the underside of the animal could be lost in heavy shadow. The result will be unattractive, and lacking in much of the detail that should give character to your photo.

There is nothing wrong with taking your wildlife photos on a sunny day. Just remember the lesson from landscape photography and seek to take your photos early in the morning and late in the afternoon. At these times the subject is illuminated from a more horizontal angle, so the full face of the animal is well-lit; you are less likely to have shadows over the eyes and other important features. If there are shadows, they will be much softer because the contrast is much lower when the sun is low in the sky.

The light at these times is also much more colourful, with the golden hues you associate with sunrise and sunset. This is a classic technique for improving landscapes, but it can be just as effective for wildlife. The warmth of the light can create an intimacy in your pictures that is completely lost in the harsh light of midday.

The second approach is to follow the rule of rainforest photography, and take your photos in overcast weather. This allows you to catch your subject in very even, low-contrast light.

I find cloudy days particularly useful for animals with glossy surfaces. Frogs, for example, have damp, shiny skin that reflects a lot of light. In glaring conditions a green frog may appear mostly grey or silver in a photo. On a cloudy day the same frog will be shown in its true colours.

Birds can often appear more colourful on a cloudy day, for the very same reason. The sun shining on glossy feathers can create a lot of reflection, robbing the photo of its natural colour. It may seem the opposite of what you would expect, but the dull light of a cloudy day can actually produce the truest colours in a bright wildlife subject.

One final question you may ask: should you use a flash to illuminate a wildlife photo? My answer to that is a definite "NO." Flash photography bathes the subject in white light, coming from directly in front of the subject. It may illuminate the subject, but at the same time rob it of the natural play of light and shade that makes a good photo so appealing.

Some wildlife photography experts use multiple flashes to brightly illuminate a subject from every possible angle. This approach can work very well, but remember; these are experts in flash photography. If you are at the beginner stage, I recommend learning to work with natural light. When you get the hang of it, I guarantee you will be happy with the results.

Friday 20 November 2015

How To Resize Photos Or Images


You have just taken your digital photos, now you need to convert them to be just the right size. Whatever your purpose is - you may want wallpaper for your phone, you may be a budding webmaster, you need to send some photos through email to your family or friends - you need to resize your photos.

It's not necessary that you know what size your photos are; what's important is that you know what size you want them to be. Of course it helps to set your camera for the right size (the setting might be called "resolution"). If you know how to do that, your camera to take bigger, clearer photos; however, they will eat up memory faster than smaller ones. You don't have to make a choice between two extremes, though. If you want to take a lot of photos and still want acceptable quality, then you can go for medium resolution.

Most cameras have a setting like medium resolution. If there's no such setting, something around 600 pixels wide gives you a size that is acceptable, unless you want an incredibly artistic photo that you'll want as big as possible.

Camera manuals have additional specific tips on resolution or image quality settings. Whatever your camera is, whether it's a cell phone camera, a web cam, or a regular digital camera, or you scanned some photographs from your family album, there are some settings to configure. Cameras come with default factory settings that are good for general usage. This setting will allow you to get acceptable image qualities without knowing all the tricks from the manual.

Now, let's get back to the photos that are already saved in your hard drive. If the photos are too big for the application you need them for, you can easily resize them with the Bulk Photo Resizer, an easy to use software you can download and try out for free.

The question is: what size is the right size? For attaching photos to email, a conservative size is about 400 pixels wide. For use in social networking or dating sites, you will want to check on the resolution they prefer. Resizing the photo to the sites required or preferred dimensions will give you the best-looking result. After clicking on a thumbnail (the smaller image), you see the larger image which is usually around 300 pixels wide, although this varies. Finally, if you're creating wallpaper or an image for your screen saver, you need to consider your monitor's resolution, unless you just want to let Windows stretch the image. The resolution would not be quite that good if you do this.

Whatever size you decide on choosing, you'll need to do a lot of the following three things: crop, resize, and compress. Our featured program, Bulk Photo Resizer does all these three easily. The user interface is very simple; using the software is very easy to learn. Use it for one photo at a time, or use it on hundreds or even thousands of photos all at once. Our software testers found it nearly impossible to make mistakes. The software even prevents you from stretching the photo too tall or wide keeping everything the right shape. This is called "preserving the aspect ratio." The resizing choices Bulk Photo Resizer gives you are already preset to ensure that the aspect ratio is preserved.

One thing that is almost as bad as stretching your photo out of shape is enlarging it. If your photo is not large enough, it's best to leave it at its resolution. Bulk Photo Resizer prevents you from enlarging the photo. If you want larger photos from you camera, you need to learn how to set it for higher resolution photos.

Why does Bulk Photo Resizer prevent enlarging? When digital photos are enlarged, they start to get jagged edges known as the "jaggies", which are the little squares that make up the image. If a photo gets too big, it starts to look like what they do on TV to hide someone's face or license plate, turning it into little squares. This effect is called pixelation.

Great news! There's no problem if you don't know what the size of your photo is, Bulk Photo Resizer will tell you!

If you need to know what the size of your photo is and you don't have software similar to Bulk Photo Resizer, you can check the photo on your computer using a Windows program called Windows Explorer. Windows explorer will help you find where your files are. First, you need find the directory that has your photos. Thumbnail view will be very helpful in finding photos. To switch to Thumbnail View, just click View (in the menu row near the top of the screen), and then select Thumbnails. Windows explorer helps you figure out what directory to look in by showing you some of the images in each directory when you are in thumbnail view.

After you find your photo, right click on its thumbnail or file name, then select Properties, and click on the Summary tab. This tab will show you the height and width of your photo in pixels.

Before resizing your photo, you should consider cropping. Cropping a photo simply means you are trimming away the parts around the outside edge so that you can have the things in the photo positioned and featured the way you want. Look at some photos in a magazine, or observe how things look in movie scenes. You will notice that the important parts of the photo stand out. They aren't surrounded by too much of the scenery or background, unless there's a good reason to show it. Never show someone from the chest up and then have several inches of sky overhead as though his head was a bulls-eye. Have his head shown at the top of the photo.

The Bulk Photo Resizer software makes it very easy to crop any image. You will actually see right away how it will look. It's also very easy to undo things and try over.

After cropping an image, it will have a smaller size. You can now check the size of your photo so that you can decide if it needs to be even smaller for your purposes. Don't be too eager to click that save command. When cropping an image, you might want to save it as a different file just in case you change your mind and would want to revert to the original image. This advice applies to images that you resize as well. You may just need that image in its original size later?

When saving an image, you will need to decide on how much compression to use. Compressing an image means making it take up less space on your hard drive. The problem with compression, however, is that you lose image quality. If you go too far in compressing, your photo can look downright blotchy. If you will be doing more editing to an image, you need to save it with no compression.

If you are saving an image in its final form, then some compression is usually recommended, especially for the web. If you intend to show an image on the web, you want it to be shown on visitors' browsers as quickly as possible. Social networking and dating sites have rules about how many kilobytes an image can be as well. If they say an image has to be less than 100 KB, then check to see if your image needs to be compressed or made smaller. Either of these actions (cropping / compression) will make the file size smaller. Image size and file size confuses a lot of people. Image size is how big an image looks while file size is how much space it takes up on your hard drive. Larger file sizes take more time to show up on a webpage because a visitor needs to download more data in their browser when they go to the page.

With Bulk Photo Resizer, compressing images is very easy. If you want compression to be not that obvious, use 80. Compression scale goes from zero to 100. 60 is a considerably high level of compression since the image starts to be noticeably blotchy at this setting. There should be no noticeable effect of compression at a setting of 90 or higher, although it will still reduce the file size a good bit.

As a side note, the kind of image file or file type that is compressed is usually those that end in .jpg. People usually call these file types "jay-pegs," but no one spells it that way. A great majority of photos or images on the web are in .jpg's format.

There are a lot more facts you can learn about digital photos, but now you know the most essential stuff. We hope you enjoy resizing, cropping and compressing your photos!

Beginner Photography Tips For Better Photos


You Have Been Warned:

This is an extremely long post, one of which that does not contain any technical photography tips, but instead focuses on simple yet powerful photography tips for the beginner just starting out.

With that in mind, I'd strongly advise you to read through the whole article, even if you're an average amateur, just to freshen up on the mental aspect of photography. I've never written an article on my way of thinking when taking pictures, but I think it's cool because it's not like your everyday photography tip article.

So read on for a few secrets, along with a few photos, of course.

Learn To See Creatively

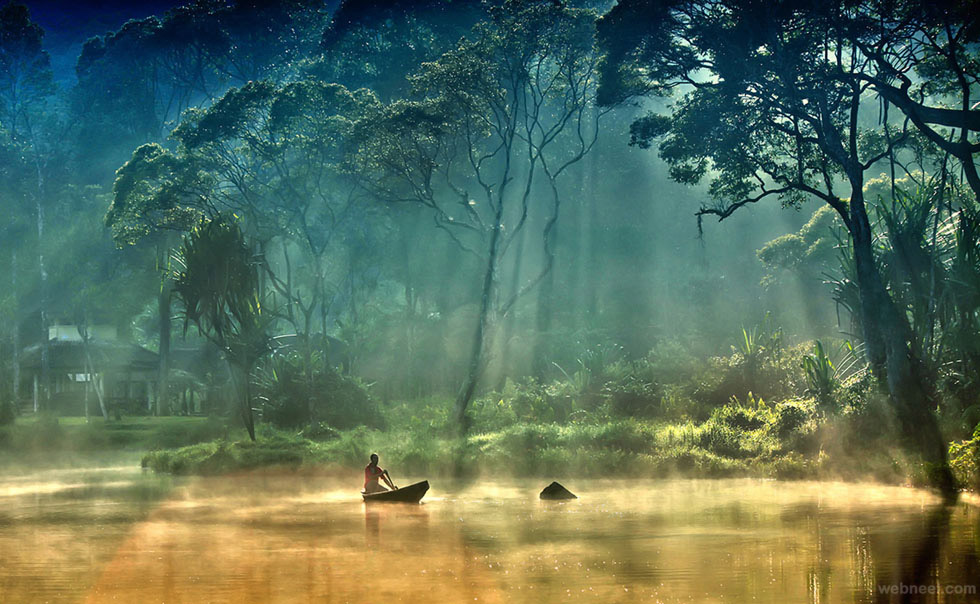
The best way to learn to see creatively is to take more photos. The reason being is because the more pictures you take and the more time you spend on your photography, the more you will begin to see things you would normally never see. The eyes of a true photographer, or artist, sees shapes, patterns, light and color when walking down an ally or across a street. For example, let's imagine I took a photo of a railroad track at night in a big city:

I saw a good photo because of the 1) light reflecting off the metal 2) the contrasts in color between the wood and metal 3) the strong diagonal lines of the track leading from edge-to-edge. Before I learned how to see creatively, I've probably walked over that railroad track a million times and not once have I seen it the way I do now. All these things added together create a great picture for the eye. That's good and all, but, the photo is missing a strong message. It doesn't emit a strong enough feeling/emotion when one views the photo. To get that, you gotta:

Feel The Moment

If the following makes any sense what-so-ever, it's that I believe everyone has the ability to see creatively in their own personal way. To see creatively is, in my opinion, to set your mind free and get in-tune with your feelings. These feelings are what drive powerful photographs. And if you can get your brain, eyes and camera to link with your feelings then you've just opened up a door that has the potential for you to become a great photographer.

You want people to feel your photos; To get a strong emotional reaction because it's all about the feeling, the impact and the structural composition of a photo. There are just a few key steps to improve the feel and impact of your photos, making them into memorable masterpieces. It's certainly not as easy as you'd think and definitely not something you can learn in a few hours or a few days. It may take weeks, months and sometimes years. It's all up to you and how much time and devotion you spend taking photos and learning photography. When you are out shooting and see something you want to take a picture of, stop and ask yourself these three questions:

Why do I want to take this photo?
What is the main message of the photo?
How am I going to take the picture effectively?
Keep asking yourself these three questions before you press the shutter and, I promise you, there will be an improvement in your photos. Let me explain the questions in more detail:
The question "why do I want to take this photo" forces you to explain your feelings. You did after all stop to take the photo because you "felt" it could be a good photo. But why? Was it because the light was good? Was there something extraordinary happening? The more you ask yourself why and the more you answer why, the more you'll start to feel the moment and start seeing creatively. Remember, it's all about feeling and communicating that feeling to the viewer.

So now that you know why you want to take the photo, you have to ask yourself, "what is the main message of the photo?" This question will better refine the first question, helping you define the actual subject whether it be exquisite shapes and colors or a person whose face tells a story of a life-long struggling journey. Whatever it is, it prepares you for the next question:

"How am I going to take the picture effectively?" Well, you can start by thinking of the first two questions and what their answers were. Imagine this as an example:

Say you're sitting in a car at a red light and see a man starting to cross the street. You feel it can make a good photo, so you ask yourself "why" and answer "because the sky is blazing red and the timing just right." So you quickly ask yourself the next question, "what is the main message of the photo" and answer "to get the feeling and mood of an urban sunset." Next you swiftly take out the camera (shame on you not having it out already) and ask yourself the final question; "How am I going to take the picture effectively?" You struggle at first, then you realize that timing is everything. So you quickly compose the shot, frantically making sure the buildings are lined up roughly using the rule of thirds and wait until the man crossing the street is right in the middle of the blinding sun, creating an awesome editorial like silhouette.

These three questions will become second-nature to you and soon you will find yourself asking and answering these questions sub-consciously. Just remember once again, that communicating your feelings through your photographs by using your creative eye and brain, all linked together will make for amazing, memorable photos.

Study Amazing Photos And Books

Granted, I'm not an amazing photographer by any sorts, just an average amateur, but I believe that if you want to take good photos, you can, and you can do so without going to school. I am self taught in pretty much everything I do, photography being my main passion. A big influence for me are amazing photos. You can learn a lot by studying them and figuring out what makes it an awesome photo just by asking yourself the same three "why", "what" and "how" questions mentioned above. I sometimes spend hours just analyzing photos, both to enjoy and also to figure out the ingredients of making it a memorable photo. Go to sites like Flickr, Photo.net, 500px and 1X because not only do they have photos, they have amazing photos. Especially 1X. Look at the photos that interest you and ask yourself why they interest you. Just start studying them, and read the peoples reactions to the photos. Learn everything there is to know.

If you like to learn through books and want something good to read, I'd suggest picking up at least 3 out of the 5 books mentioned here because all 5 of these books have made a significant impact on my photography:

The Photographer's Eye: Composition and Design for Better Digital Photos by Michael Freeman
Understanding Exposure, 3rd Edition: How to Shoot Great Photographs with Any Camera by Bryan Peterson
Scott Kelby's 7-Point System for Adobe Photoshop CS3 by Scott Kelby
The Hot Shoe Diaries: Big Light from Small Flashes by Joe McNally
The Camera (Ansel Adams Photography, Book 1) by Ansel Adams and Robert Baker
Did you notice that I picked 5 books on 5 completely different subjects? That's because with these 5 books you can learn everything from off-camera lighting and composition, to Photoshop and exposure. These books combined together are just awesome to read and study, and because they're written by very well known photographers, you know there's good info to gather inside.
Get Constructive Criticism

Improving your photography and taking good photos means you have to get advice from the pros, because they've been where you're at and know the good and bad, and the right and wrong in photography. I personally have never talked to a real "professional" photographer face-to-face. I've only chatted with pros through the use of web forums and email. I'd suggest, if you can, to meet a few pros and join them in a few gigs or whatnot, which is actually something on my to-do list because working with an actual pro will give you hands-on experience and get real feedback, real constructive criticism, unlike the kind your family and friends give you.

I'd suggest you sign up to one or all of these critique websites because they, too, can give you honest but sometimes blunt, constructive criticism. Google the following to find the sites:

photocritique
flickr
digital-photography-school
And last but not least my favorite and by far the best of them all, 1X. You have to sign up to see and use their critique system, but it's totally worth it, and free.
What you do is you sign up to one or all of the critique websites, and post a photo that you want to receive some feedback one. Most of the time these sites require you to give feedback on at least one photo before posting your own. This makes the community balanced, so everyone doesn't just keep posting pictures for critique and never give out any critiques themselves.
In addition to critique websites, there are a few photography blogs that I love, also. The first being the well-known blog authored by David Hobby called Strobist. His blog is mainly about off-camera lighting, or hence the name, strobes. I have to mention him just for the sake of mentioning him, Ken Rockwell. He's pretty much a Nikon fanatic that talks jokes a lot about a wealth of different subjects. He also has a lot of great information on Nikon camera gear. Joshua Hoffine is probably one of my favorite photographers because he sets up his shots as if they're movies. He also has a great blog so I would recommend that you follow him just so you can see his latest amazing work and how he creates them.

And now for the no brainer...

Keep Pressing That Shutter!

Practice makes perfect and taking photos is no exception. If you want to become the next best photographer in town, or in the world (hey it's possible!) you have to get out and start shooting more. And for those who log in 60 plus hours of work a week and still strive to be a great photographer, you have to find time to get out and shoot. It's tough, I know. I only work around 50 hours a week at my retail job here in Berkley, Michgan and know first-hand how hard it is finding time to take photos.

If you want to get better, you have to dedicate time to shoot pictures. When I first got into photography I didn't spend more than a few hours a month with my camera. And it showed; My photos looked the same as they did when I first started. Something needed to be done so I got into the habit of spending a few hours every week working on my technique. That eventually developed into a few hours every other day learning how to take photos. Soon I'd find myself spending hours upon hours every single day taking photos and learning, that I think my head literally got a few centimeters bigger from all the information I had gathered!

Final Words

If there's one thing that I've found out over the last year while trying to become a better photographer, it's that attitude has everything to do with photos. Most of this article has nothing to do with an actual photography "technique" if you will, because I feel that if you're told to take photos a certain way you're constricted within a set silly rules, and you will never be able to explore photography with your own feelings. Anyways, I hope I brought up some good points, ones that you will take into action soon because if you do, I know you'll soon discover that there is a great photographer within you. You just gotta have the motivation to continue and have the right attitude.

Sunday 15 November 2015

How To Make Extra Money With Selling Photos


Stories of ordinary people becoming millionaires overnight with the help of some wonderful programs are flooding us from all directions and even though many of these stories are exaggerated at best and total lies at worst, there are many ways in which you can make money, even if you are not a unique talent. Well, I don't mean that photography does not require talent, but even beginner photographers can make money by selling their photos. Most likely you will not make your first million selling photos, but this is a viable way to earn some extra cash. Photos are a product and as with all products, you need to know what to offer and where to sell it.

What You Can Sell For those people who have no idea about photography, a photo is just a photo, but for people who are familiar with photography and arts in general, there are separate distinct groups of photos. The most obvious distinction of photos is based on their content, but for the purposes of selling photos, this distinction is not as important as what the photo can be used for.

The two major uses of photos are for the Web and in print. Web photos tend to be low resolution and lower quality is acceptable for them, while print photos generally are high resolution and low quality is unacceptable. As a beginner photographer, you will most likely target the Web market first because the entry barrier there is not as high as with the printing market. Additionally, if your camera is not a high-end one, your skills in photo processing will hardly be able to compensate for this, so in this case, print photos are not an option for you because of technical reasons. This shouldn't discourage you because the Web market is vast and there is a lot of space for beginners.

The main buyers on the Web market are Web designers, who make sites for their clients. For many Web designers it is much easier and cheaper to buy ready-made photos than to take the pictures themselves. A solo Web designer can make 10 or even more middle-sized sites a month, which means that he or she will need at least 200-300 photos and illustrations. This does not mean that you will be able to sell 200-300 photos a month to each Web designer you contact, but even if you manage to sell him or her 10-20 photos a month, or more realistically a batch of several hundred photos for him or her to use in the next year, then you can make a lot of money.

Similar to other arts, photography also has genres. Not surprisingly, photos of people, nature and cities sell best. Another category, which is especially popular with designers, is objects of different kinds. You can shoot a light bulb, a pen, some pills, or whatever object you choose, and this may be enough. Add some unobtrusive background to it and you get a cool photo for a Web site. But be careful with copyrights because not all manufacturers will be happy if you shoot their products and make money from this. Try shooting generic products, which have no visible branding.

Similar copyright issues apply to people. If you want to shoot people and you want to be on the safe side, ask them to sign a model contract, which clarifies all the issues in regard to copyrights and sales. Very often you won't have to hire professional models and you can shoot your friends and relatives instead. Your models don't have to be extremely beautiful because pictures of ordinary people also sell well. Shooting friends and relatives has one more advantage - they work cheaply or free.

Nature and urban photos are always in demand, but avoid photos which look as if they were taken by tourists because they simply look too unprofessional to be sold. Abstractions are also popular, so if you are creative with PhotoShop or another image processing program you can wake up the Picasso in you.

Where You Can Sell The type of photos you have is one of the major factors in choosing your sales channels. Basically, the options to sell your photos are the following:

Stock photo sites. Stock photo sites are the most popular sales channel. Stock photos are photos you have already taken, i.e. you have in stock. You open an account with a stock photo site, upload your images and every time somebody downloads your photo, you earn a commission. Different sites have different policies, but it's not unusual to earn $40 per photo each time it is downloaded. If your photos are popular, it is not impossible to reach dozens of downloads per week. One of the prerequisites for success is to submit sought after photos and to use the right keywords in the descriptions of your photos. The best stock photo site I have found is Shutterpoint. They provide photographers an e-commerce store-front for selling photos, handle advertising and promotion, handle all purchase transactions, provide customer service, and securely deliver images to buyers. All of these features are provided for a very reasonable fee, and in addition, other members often provide valuable feedback on your photos. This is a great way to begin your career as a professional photographer.
Stock agencies. Stock agencies are similar to stock photo sites, but in addition to listing your photos, they consult buyers and handle all the legal and logistical matters. Stock agencies usually deal with professional photographers mainly but there are stock agencies, which are beginner-friendly. As with stock photo sites, you usually have to decide (if you have the choice of course) whether you want to sell exclusive rights or only per use rights.
Sell directly to newspapers and magazines. Although this is hardly the easiest way to sell your photographs, it is worth trying. Newspapers and magazines are a very tough market to get into but can be a very high paying one. For a start, you can try your local or community media.
eBay and similar auctions. Auction sites, such as eBay, are one more sales outlet you can try. Yes you really can earn decent income from selling photos on eBay This is a good alternative if you sell other products in addition to photos, but even if photos are the only thing you sell, eBay and the other auction sites can do a lot for you. Make sure to avoid small and dark photos. Listings should be created which are descriptive and include realistic prices. Check the Completed Listings option when searching to see examples of photos which have sold.
Freelance sites. Unlike the other options listed up to here, freelance sites are generally a place for work for hire projects. This means that usually a buyer comes and asks you to make some photos especially for him or her, but very often there are buyers who offer to purchase your already made (or stock) photos as well.
Your own website. Even if the other options work great for you, having your own website is a valuable sales channel. You can offer everything you like - i.e. low resolution mockups for free, paid downloads, etc. The downside is that you need to market your site, otherwise you will hardly get much traffic and, respectively, sales. Search engine optimization is a must and if you are really serious about selling your photos via your website, you can even consider starting an affiliate program.
Free samples. These days advertisements are something one can hardly sell without. Instead of launching an expensive campaign, you can give photos away for free but keep your logo on them. This is a kind of advertisement and it will bring you new customers.

Wednesday 4 November 2015

How To Choosing Stock Photos For Your Header Web


If you're thinking of creating your own header for your Web site, you can really benefit from knowing how a Web designer thinks when choosing photos.

Stock photos are available from a variety of Web sites and services. The price and quality vary considerably, but for most of us, inexpensive stock photos are all we'll ever need. Two typical stock photo sites are Dreamstime.com and BigStockPhoto.com, but there are many more.

By the way, recently I was browsing a well-known, glossy magazine and recognized a stock photo I'd seen the day before on Dreamstime.com. So, you don't have to be concerned about the quality of inexpensive stock photos; even the big magazines use them!

So let's see how I would approach finding suitable photos for my client's header...

First, I'll ask my client about their business: their typical audience, and their market's gender and age group. I'll also want to know about the mood or feeling my client wants for the Web site. With the answers to these questions I can choose photos with the appropriate colours and ambience.

For instance, a spa will want tranquil colours, usually light blues and pale greens, and photos of blissed-out people (typically women) getting a massage or facial. They may use smooth stones, a leaf or a flower to convey a Zen atmosphere.

A children's daycare on the other hand, will want primary colours (red, yellow, blue) and photos of energetic, happy kids. They may use clipart balloons, crayons or building blocks in the header or for the navigation.

Note: Clipart objects, people, backgrounds, buttons, badges, icons, cartoons and other images are also available on stock photo sites.

Now I will visit two or three stock photo sites and select photos based on my client's criteria and my own requirements for the header. (The Web designer's requirements are just as important as the client's requirements.)

To find appropriate photos, I'll enter keywords into the search box. This is almost an art in itself. For a spa site, I might start with the most general term "spa," and end up with phrases like "happy woman massage," "massage stones," "tranquility, "wellness," "candles," "spa products," etc.

When I'm choosing photos, I'm automatically running them through my internal filter:

1. Does this photo have the right colours? Or will I have to modify them in Photoshop?

While colours can be changed in Photoshop, I will first try to find photos with the right colours. However, if I find the perfect photo, but the colours are wrong, I will definitely consider changing the colours in Photoshop.

If the colours for the Web site haven't yet been determined, I may base the colours for the header (and the site) on the photo. Designers often do this, especially if they are using only one photo in the header. Pulling the colours from the photo will almost always guarantee that the Web site will look pulled together.

2. Are the people in this photo facing the direction I want them to face in the header? People (and objects with a "front" like a car or even a teapot) should face toward the middle of the header or straight ahead. Note: Flipping over a photo can result in an odd looking image because of the play of light and shadow.

3. Can I crop this photo to focus it better on the subject? Many photos have more potential when they are cropped in tight to the subject, sometimes even a portion of the subject: a woman's eyes, the stitching on a baseball, half a golf club on a tee, the bow of a canoe, brightly coloured rain slickers hanging on hooks, a country mailbox. Look at art magazines or book covers for ideas.

4. Is this photo portrait or landscape style? Portrait style is tall, rather than wide. Landscape style is the opposite. In a shallow header, landscape-style photos will fit better. A portrait-style photo will have to be reduced considerably in size to fit a shallow header and may not work at all. But it might work if cropped in close to the subject (see #3 above).

5. Can I use this photo as the entire header? To use a photo for the entire header, you will need to be able to take a slice of the image that tells a story: a lone tree in a field, a mountain climber with arms upraised on a mountain vista, a runner on a stretch of deserted beach.

6. Will I need to find several photos to tell the story? If I use multiple photos will they look good together? Will the photos blend well into a montage or will they look better as a row of individual photos? Either way, I'll be looking for photos that complement one another and have fairly neutral colours (unless I'm planning to deliberately emphasize some element in the photos).

Finally, if I find a photo close to what I want, but not quite right, I'll do a couple of things. I'll locate the photographer's portfolio and check to see if he or she has taken similar photos, maybe using the same model or scene. Often this will open up a whole realm of photos that I might have overlooked.

I'll also use the "similar photos" tool that brings up a batch of photos with similar keywords to the one chosen. Not the keywords I typed in to find the photo originally, but keywords the photographer gave when they uploaded the photograph to the site. This can open up yet another realm of photos. Sometimes these paths lead nowhere, but they're always worth a try when the photo is close to, but not quite, right.

I still won't buy any photos at this point. I'll simply add the photos I've chosen to a lightbox and email it to my client to give them a chance to comment on the photos and veto ones that don't fit their vision for the header. After my client has finished evaluating the photos, hopefully I'll still have some really good ones to use for the header.

I still won't buy any photos. Instead I'll use the "comp" versions of the photos to create the header. These versions are big enough to use in the header, but they have a watermark on them. If I plan to slice or crop the photo I can still see what that will look like on the comp. If I plan to use the whole photo as the header, I will use the comp to create a miniature header, so I can see how it will look.

I will buy the photos once I'm satisfied I have the best photo or the right combination of photos for the header.

Now you know some of the thought processes a Web designer like me goes through while choosing photos. Hopefully, you can use these ideas to choose good photos for your own header.